5 Things To Do When You First Log Into Parse.ly
You just logged into Parse.ly for the first time…congrats! Now what? Here are five things to make sure you do before anything else:
- Add the Parse.ly bookmarklet to your browser
- Configure your overview screen
- Set up your first scheduled report
- Set up your first alert
- Create your first saved view
1. Add the Parse.ly bookmarklet to your browser
Benefit: Save time accessing the Parse.ly dashboard
If you’re using Google Chrome, the first thing we recommend you do is add the “Open in Parse.ly” bookmarklet to your browser. This will allow you to navigate from any content page on your website directly to the corresponding post info page within Parse.ly with just one click.
To set this up, visit this help doc, click on the green button that says “Open in Parse.ly,” and drag the link from the button into your bookmarks bar. Now the Parse.ly bookmarklet lives on your browser bookmarks bar.
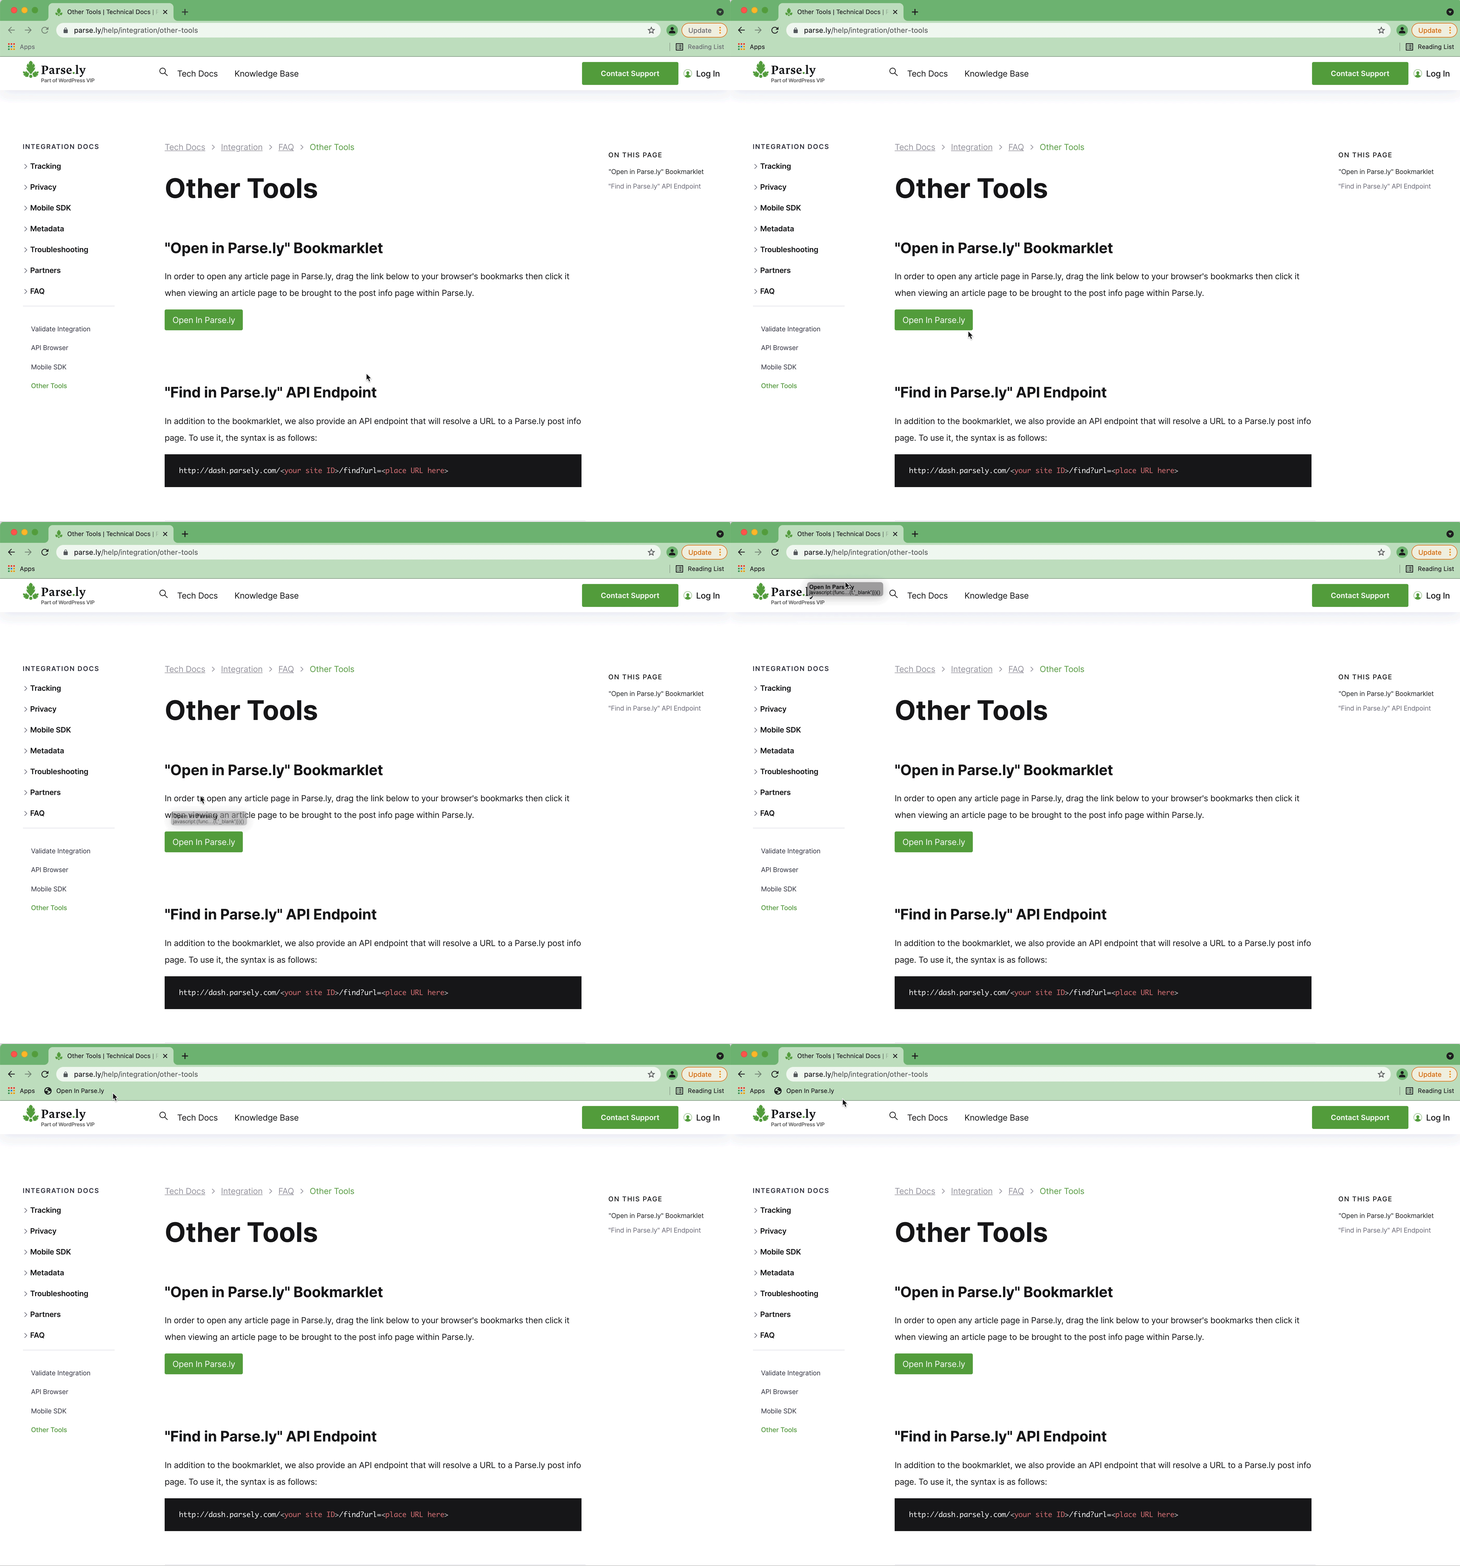
With the bookmarklet in place, navigate to any page on your site, click on the bookmarklet link you just created, and you’ll automatically be taken to the corresponding post info page in Parse.ly.
2. Configure your overview screen
Benefit: Gauge performance at a glance and take action faster
The Overview screen is the first screen you’ll see when you open up your Parse.ly dashboard. You’ll see a snapshot of what your audience is paying attention to and how your content is performing in real-time, so you immediately get a sense of where to direct your efforts.
You can customize the three columns at the bottom of the Overview screen to show your content’s performance in whatever terms or metrics you want. Click the cog icon above each of the columns to open the settings panel, then choose what stats and listings to display.
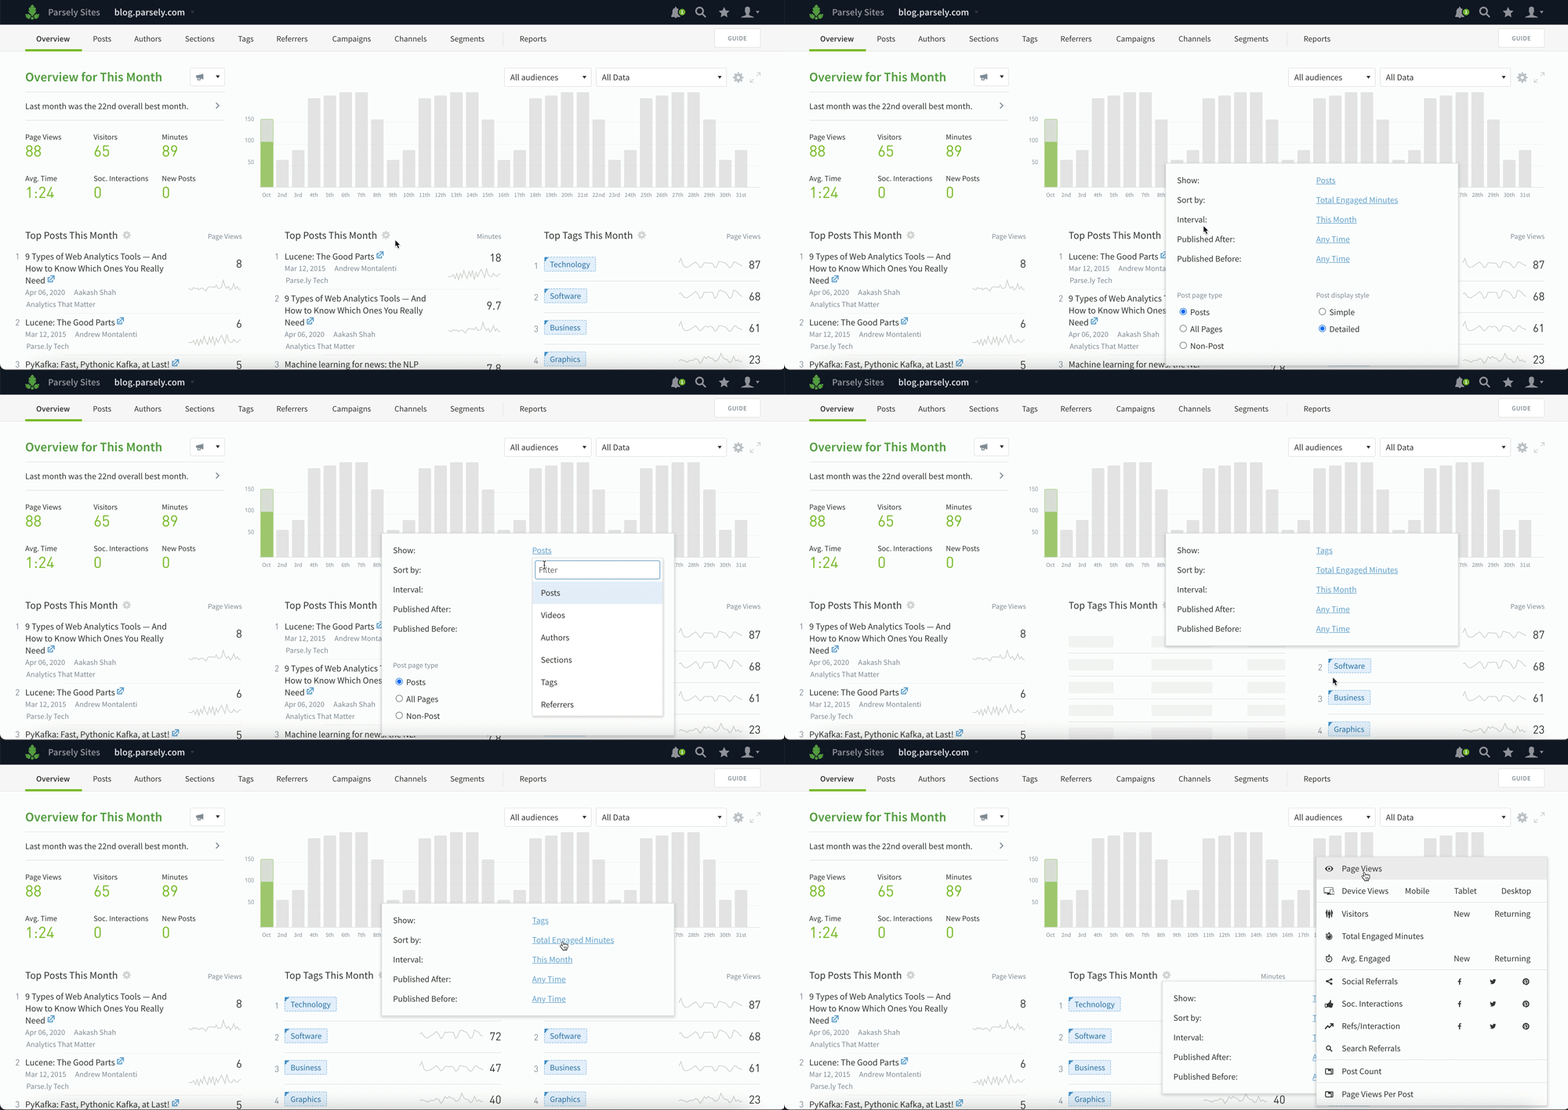
The settings you choose will save to your browser and show up every time you open Parse.ly.
You can also customize the rest of the Overview screen by clicking on the cog icon in the top right corner of the page.
Here are a few ideas for configuring the Overview screen for various roles.
3. Set up your first scheduled report
Benefit: Automatically keep your team on the same page
Next, set up a daily or weekly report that shows what happened with your content for a previous time period. Reports can be sent to whoever you want, and they’re customizable by metric, frequency and category.
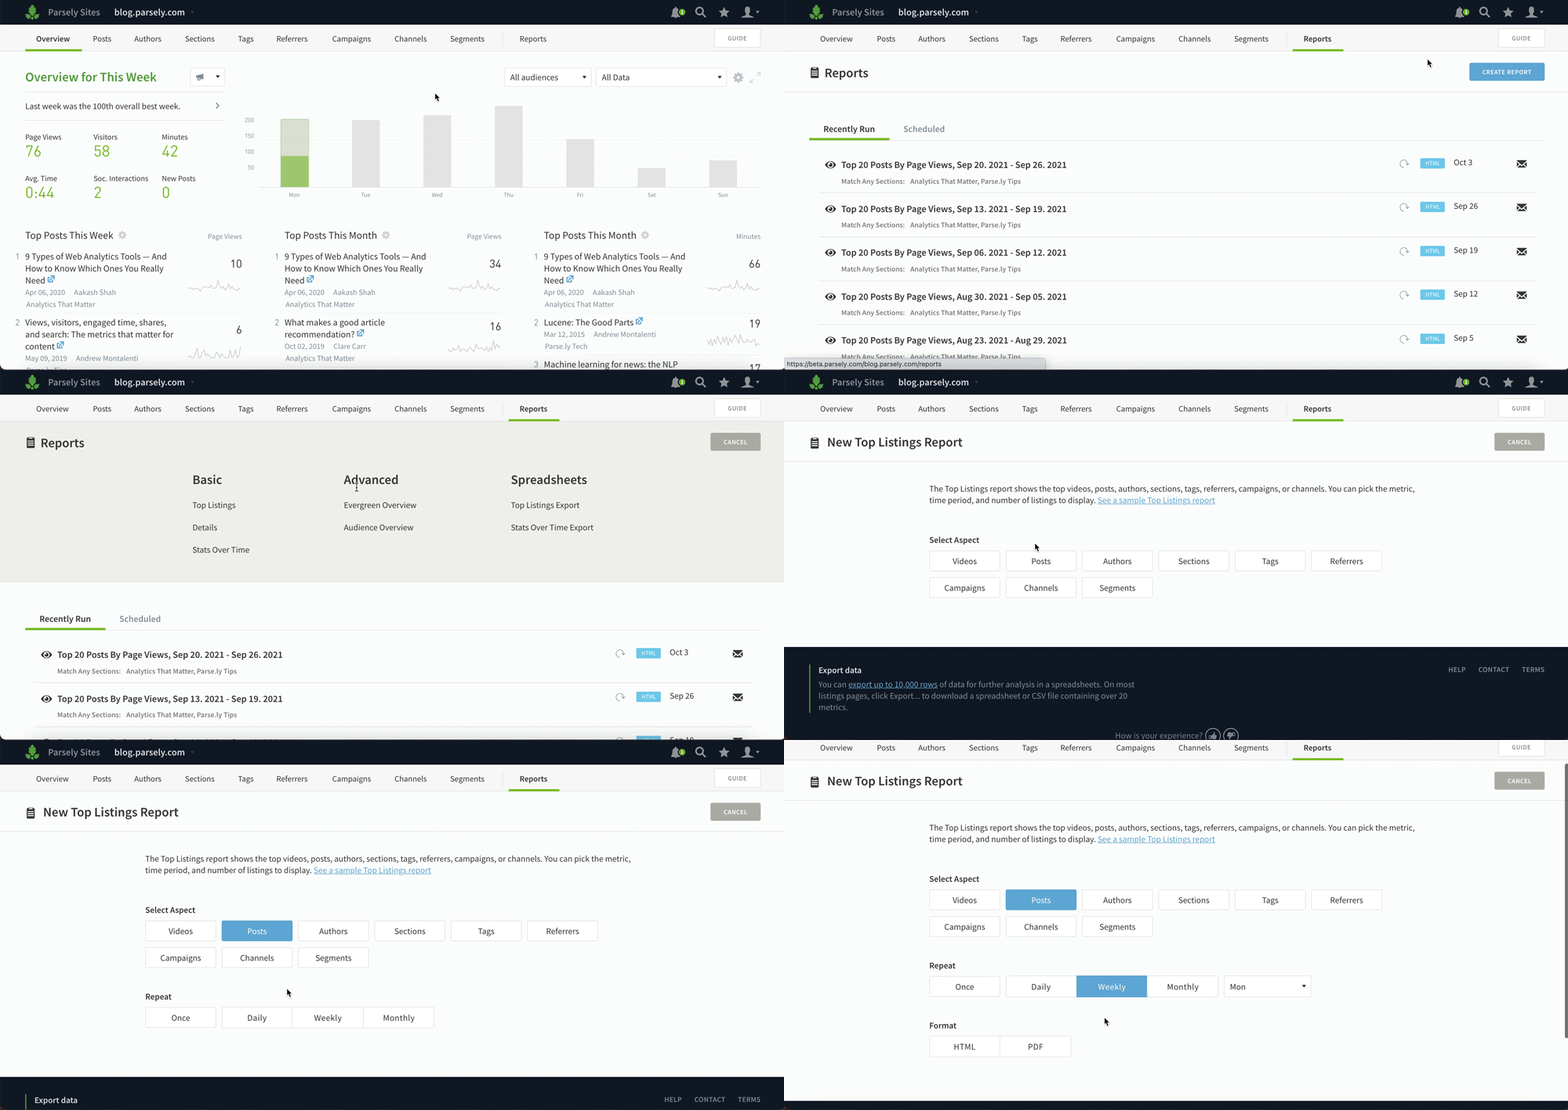
Depending on your role and what type of organization you work for, there are a variety of basic and advanced reports you can set up that will help you do your job.
The Top Listings report shows you top posts, videos, authors, sections, tags, or referrers. You can pick the metric, time period, and number of listings to display. If you oversee a team of several writers, set up a report that breaks down how each author is performing.
The Details report is a data summary for a particular author, section, tag, or for the whole site. It goes a bit deeper, beyond a list of what’s performing, to help you understand traffic patterns and why certain stories did as well as they did.
The Stats Over Time report shows you how traffic has changed for a particular author, section, tag, or for the whole site. You’ll uncover things like how a particular initiative changed performance over time, how many stories were published each day, which days of the week lead to more engagement, etc.
4. Set up your first alert
Benefit: Optimize in real-time
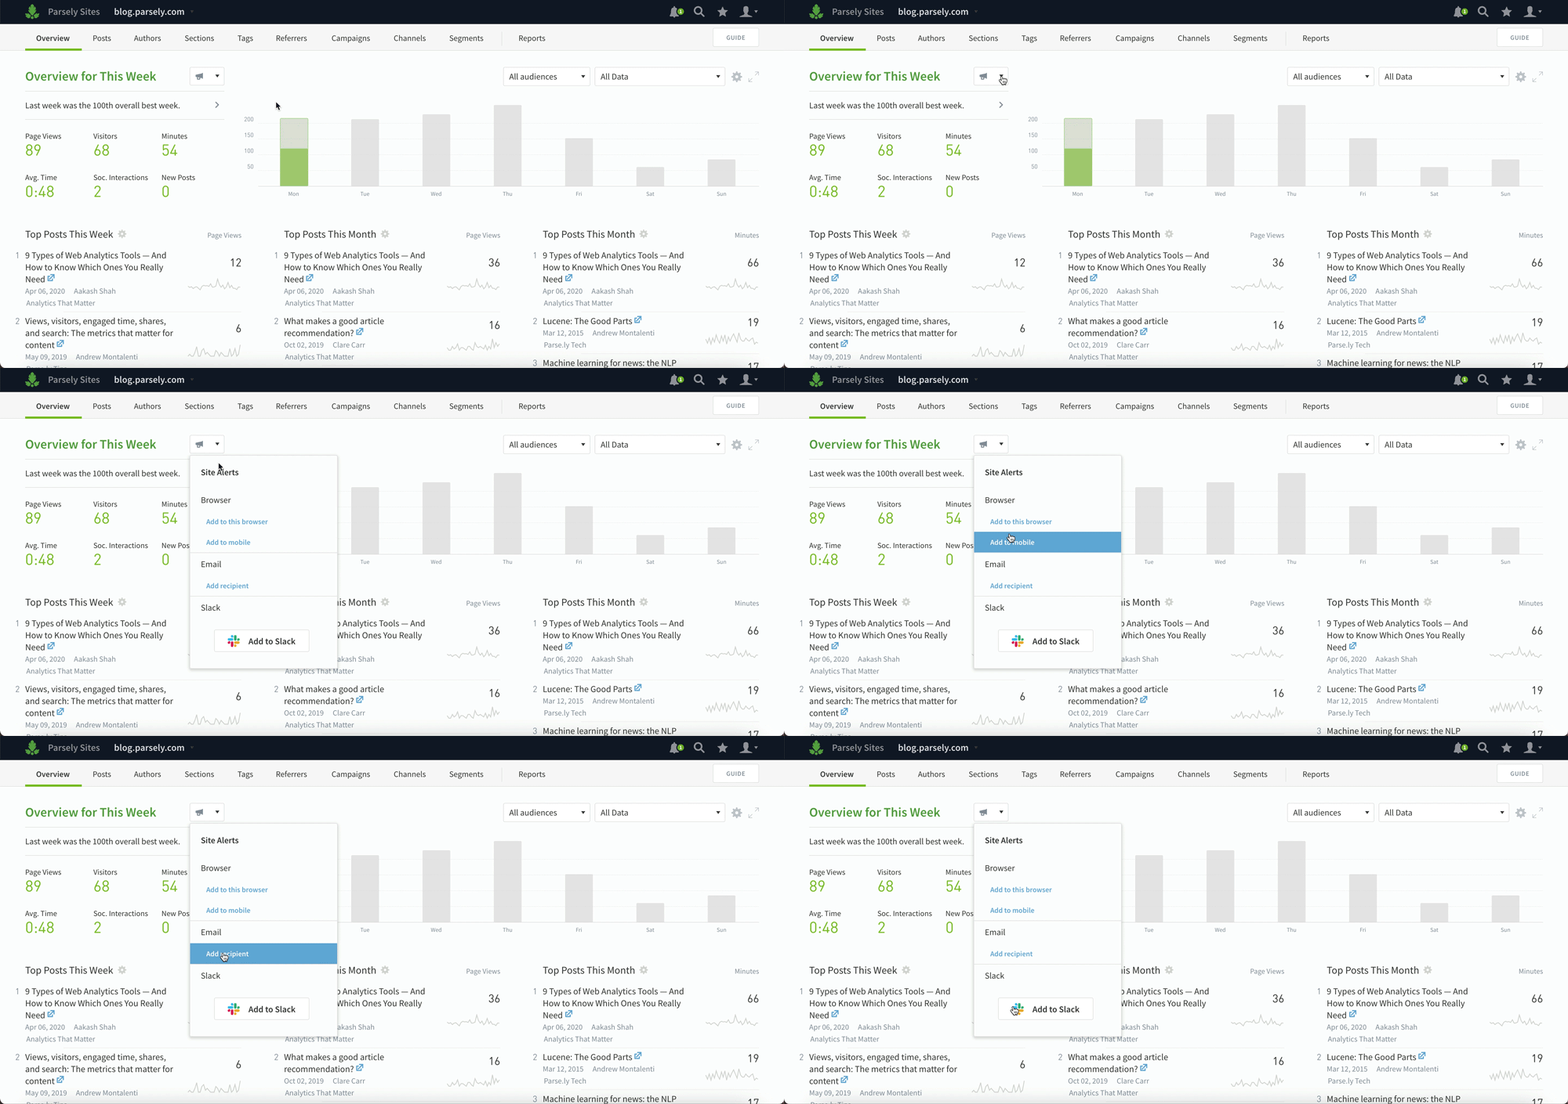
Alerts keep you informed about notable traffic to your content without constantly needing to check the Parse.ly dashboard. You can choose to receive alerts on your browser, on your mobile phone, in Slack, or in email when posts receive significantly more traffic than usual.
You can set up an alert from any page that has a megaphone icon in the upper left-hand corner.
To set up an alert for any story trending on your site, start from the Overview screen, click on the megaphone, choose a type of alert, and follow the instructions that come up. A blue megaphone indicates an alert has been set up.
5. Create your first saved view
Benefit: Orient your team and save time
Saved views give you the ability to bookmark dashboard pages internally within Parse.ly for easy access. Once you set up a combination of filters that you find useful, save the view so you don’t have to redo those configurations each time you use the dashboard.
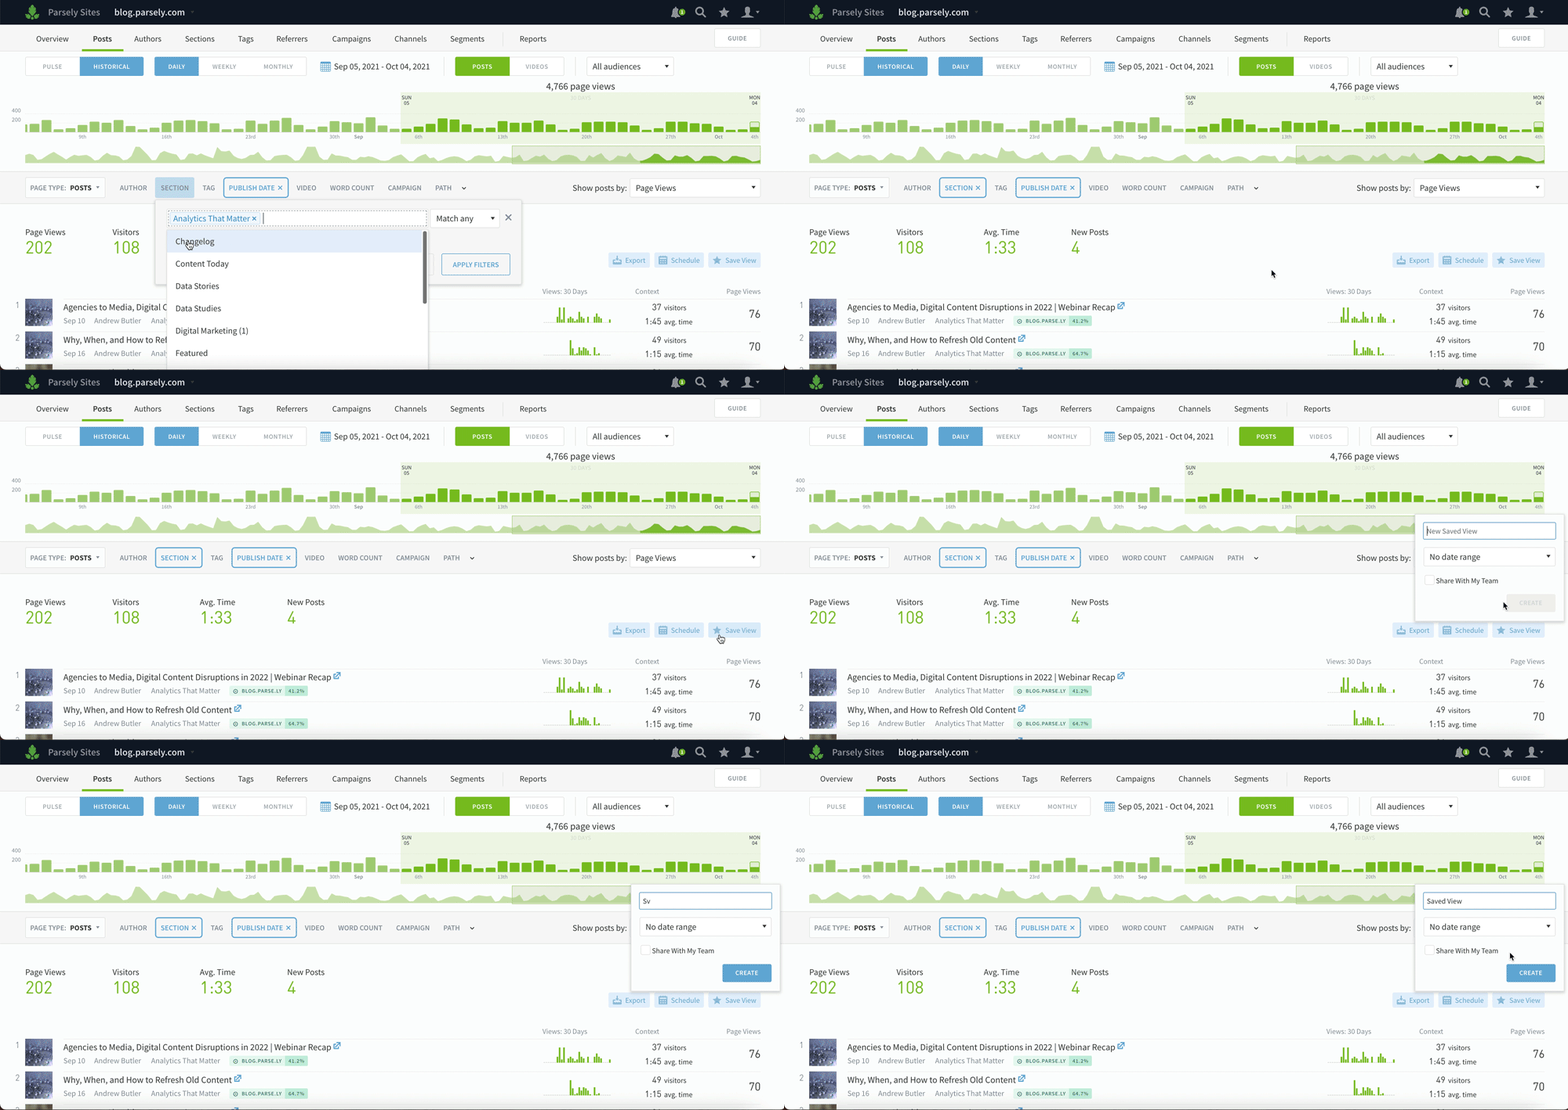
Perhaps you want to quickly see what stories in a specific section received the most traffic from Facebook during the past week. Or maybe you want to track a specific group of authors on a single screen.
Set up the page how you want it, and then save the view so you can come back to it whenever by clicking on the star in the menu in the upper right corner of the screen:
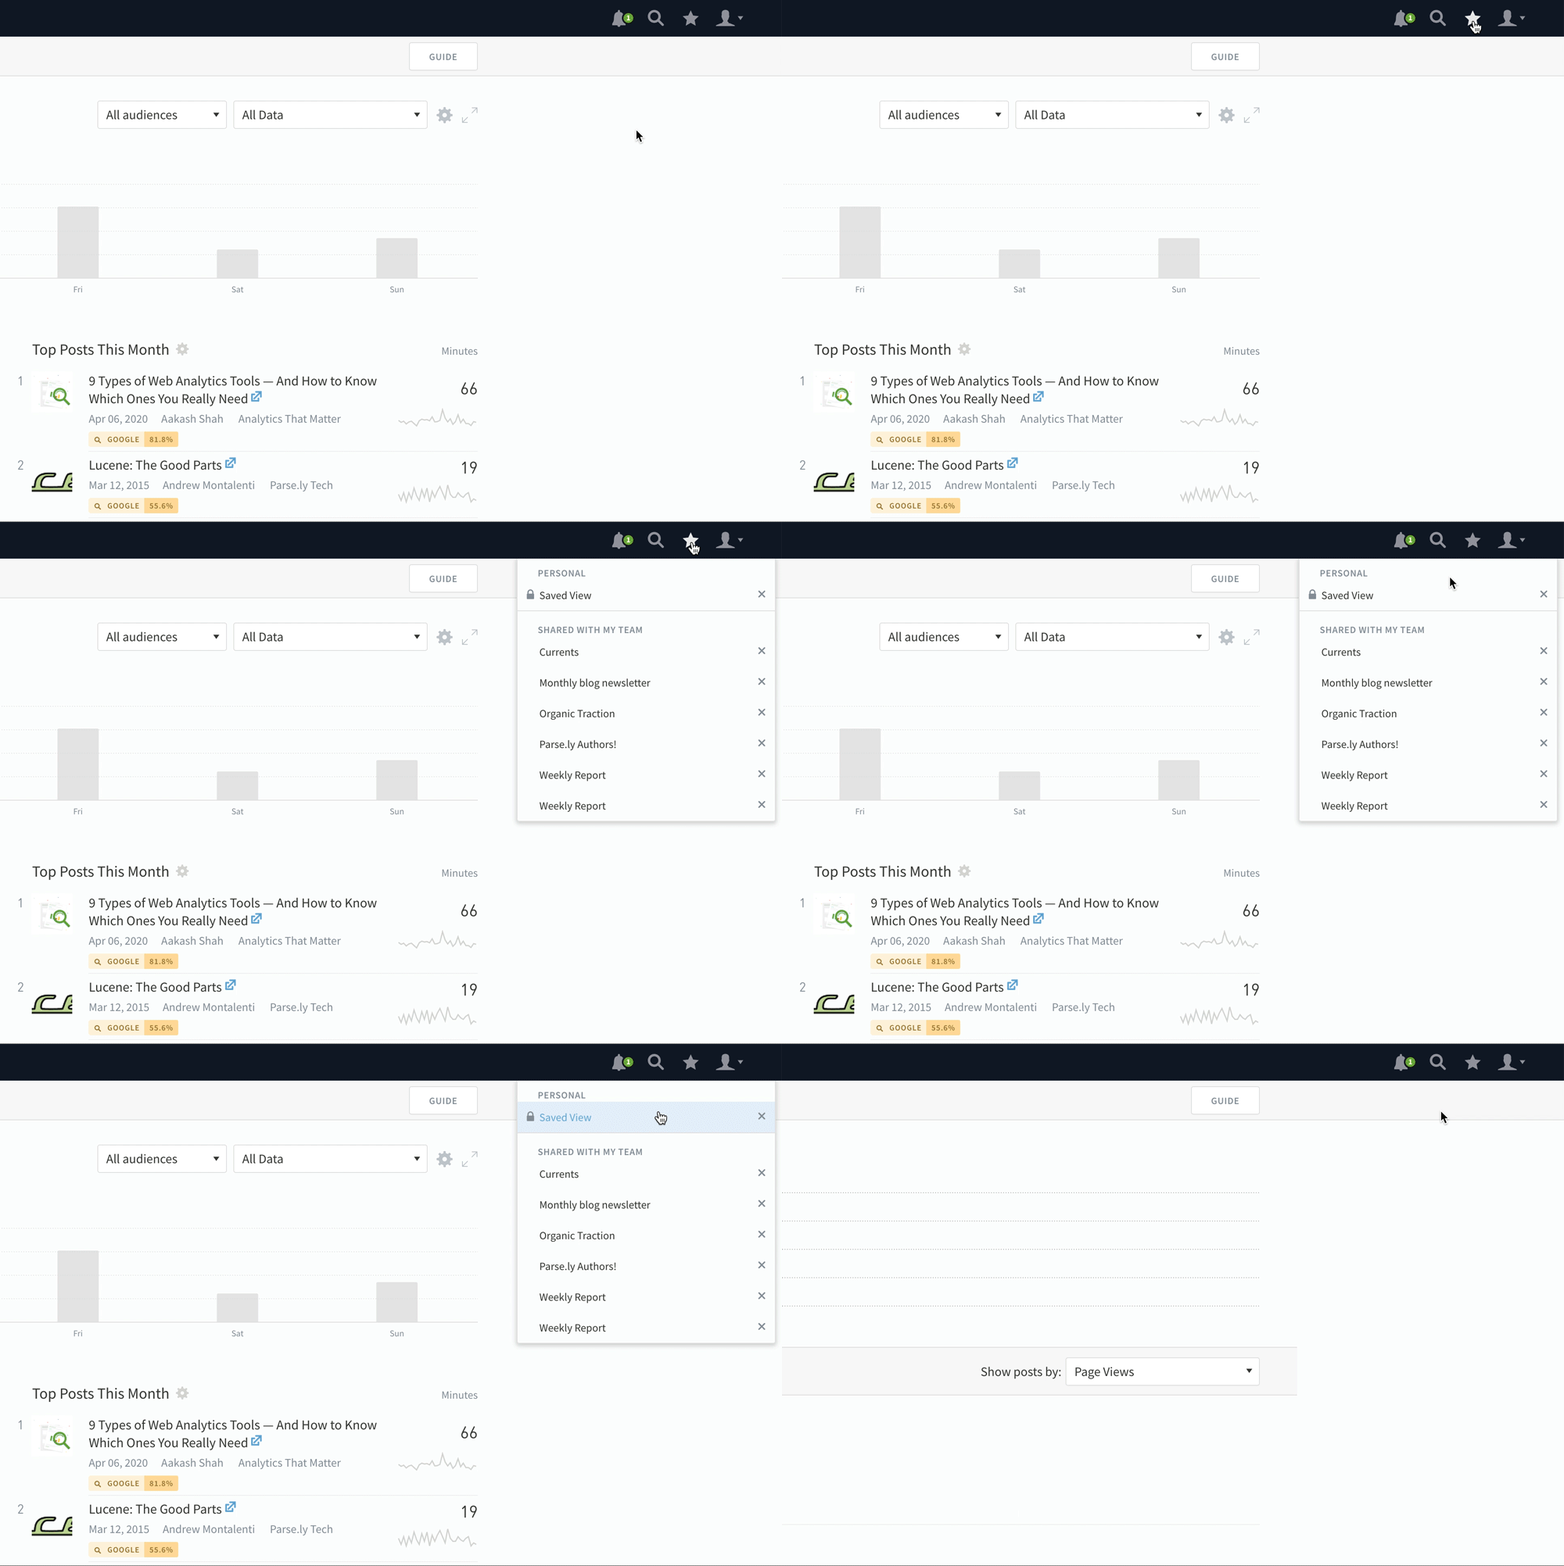
You can also click on the “Guide” button to find quick clicks to suggested views. These give you other ways to think about and look at your content and show you the dashboard settings to set up those views.
Have any questions or want to learn more about getting the most out of Parse.ly? Reach out to our team of content analytics experts for more help!